|
 Adobe
Photoshop has long set the standards for an image-editing program for
output to print. Now, Adobe brings this professional image manipulation
program into the Internet era with the release of Photoshop 5.5, an
integrated suite that includes ImageReady 2.0. The combination of these
programs provides a comprehensive environment for designing both print
and Web graphics, eliminating the need to use a hodge-podge of different
programs. Photoshop and ImageReady are still separate applications (though
ImageReady is no longer available separately), but now you can toggle
between the two by clicking a button in either program. The interface
of both programs is Adobe
Photoshop has long set the standards for an image-editing program for
output to print. Now, Adobe brings this professional image manipulation
program into the Internet era with the release of Photoshop 5.5, an
integrated suite that includes ImageReady 2.0. The combination of these
programs provides a comprehensive environment for designing both print
and Web graphics, eliminating the need to use a hodge-podge of different
programs. Photoshop and ImageReady are still separate applications (though
ImageReady is no longer available separately), but now you can toggle
between the two by clicking a button in either program. The interface
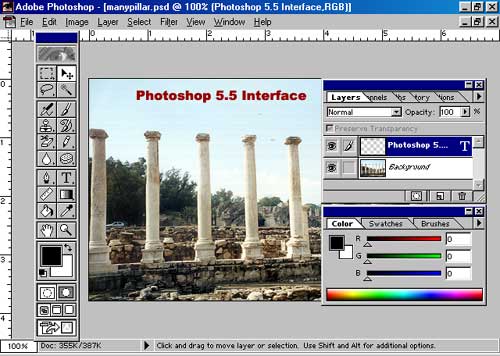
of both programs is  very
similar, and the palettes are nearly identical, so it is easy to switch
from one to the other without a steep learning curve (see image to the
left for Photoshop interface, and see image on the right for ImageReady
interface). With ImageReady, you can create advanced Web graphics using
sliced images, sophisticated JavaScript rollovers, dynamic animations,
and image maps. very
similar, and the palettes are nearly identical, so it is easy to switch
from one to the other without a steep learning curve (see image to the
left for Photoshop interface, and see image on the right for ImageReady
interface). With ImageReady, you can create advanced Web graphics using
sliced images, sophisticated JavaScript rollovers, dynamic animations,
and image maps.  Photoshop
5.5 also has powerful new Web functions such as optimization features
to help you create high-qualtiy Web graphics with the smallest possible
file sizes. By using the Save for Web command, you can preview your
graphics under various compression levels (up to four) or check how
a graphic will appear on both the Mac and a Windows PC. The program
supports GIF, JPEG, PNG-8, and PNG-24 formats. Also there is a Lossy
GIF feature which gives you 10-50% smaller GIF files, with minimal loss
of image quality. Also new to version 5.5 is support for the PDF 1.3
format, making the program fully Photoshop
5.5 also has powerful new Web functions such as optimization features
to help you create high-qualtiy Web graphics with the smallest possible
file sizes. By using the Save for Web command, you can preview your
graphics under various compression levels (up to four) or check how
a graphic will appear on both the Mac and a Windows PC. The program
supports GIF, JPEG, PNG-8, and PNG-24 formats. Also there is a Lossy
GIF feature which gives you 10-50% smaller GIF files, with minimal loss
of image quality. Also new to version 5.5 is support for the PDF 1.3
format, making the program fully  compatible
with Adobe Acrobat 4. Some of the other new features or tools include:
a button on the color picker dialog that only displays and lets you
pick Web safe colors; an Art History brush that lets you apply painterly
effects to your work; a smarter Eraser tool that lets you choose to
erase all pixels or only those similar to the one you select; an Extract
Image feature that helps in masking objects and backgrounds by pulling
out an image you specify while minimizing the "haloing" that
sometimes makes compositing obvious; and improved text tools. compatible
with Adobe Acrobat 4. Some of the other new features or tools include:
a button on the color picker dialog that only displays and lets you
pick Web safe colors; an Art History brush that lets you apply painterly
effects to your work; a smarter Eraser tool that lets you choose to
erase all pixels or only those similar to the one you select; an Extract
Image feature that helps in masking objects and backgrounds by pulling
out an image you specify while minimizing the "haloing" that
sometimes makes compositing obvious; and improved text tools.
Available for both PC and Macintosh. Price: $610 for all platforms.
Registered users of Photoshop 5.0 and later and ImageReady 1.0 can upgrade
to version 5.5 for $129. Registered users of earlier versions of Photoshop
can upgrade to version 5.5 for $199. The Adobe Web site has a wealth
of information on related software. Great place for beginner users to
peruse for general information, step-by-step instructions on many features,
upgrades, free downloadable demos, Adobe Magazine subscription, and
other downloadable files. There is also an extensive selection of cool
tips and tricks, available from the site as well. Web site: http://www.adobe.com
|
|
What's New in Photoshop 5.5
- Save for Web Dialog
Box--Allows two-up and four-up previewing of images
in different Web graphics file formats and with different file attributes.
- New Web Features--Optimize images
for the Web in GIF, JPEG, and PNG file format, create background transparency
and background matting, and preview and control dithering.
- Magic Eraser Tool--Erases solid-colored
areas to transparency with a single click.
- Background Eraser Tool--Erases
areas to transparency by dragging. This tool is useful for assigning
transparency to the background around hard-edged objects.
- Extract Command--Extracts foreground
objects from their background. Designed to isolate objects with wispy
or intricate edges.
- Art History Brush Tool--Paints
with stylized strokes that approximate the look of different paint
styles.
- Automated Export of Multiple Images--Three
new or enhanced commands automate the export of multiple images: Contact
Sheet II places a series of images as thumbnail previews on a single
page; Picture Package places multiple copies of a source image on
a single page, similar to the photo packages traditionally sold by
portrait studios; Web Photos Gallery exports a collection of images
as a Web site, automatically creating the required HTML files.
- Auto Contrast Command--Lets
you adjust the highlights and shadows of images automatically.
- Contiguous Option--Restricts
the action of the magic wand or paint bucket tool to pixels immediately
adjacent to the area clicked. Deselecting this option allows all eligible
pixels in the image to be selected or filled.
- New Type Options in the Type Tool Dialog
Box--Let you apply simulated type styles, choose from various
anti-aliasing methods, and better control the placement of low-resolution
type.

- New Indexed Color Options Under the Indexed
Color Command--Let you control dithering, the color table,
and assign background transparency. In addition, you can use the color
table to assign transparency to a specified color in the image.
- GIF and PNG Transparency Support--Provides
direct support for transparent areas in indexed-color images. In addition,
GIF directly supports transparency in RGB images.
- Direct GIF Support for RGB Images--Lets
you save RGB images directly in GIF format using the Save a Copy command
now.
- Expanded TIFF Support--Opens
(in Photoshop) TIFF files that have been saved using the Deflate and
JPEG compression methods.
- New JPEG Save Options--Let you
control the appearance of originally transparent areas, compress file
sizes further, and preview the size and download time of the file
when saving as JPEG.
- PDF Color Support for CMYK Images--Lets
you embed ICC profiles when saving a CMYK image in PDF format.
What's New in ImageReady 2.0
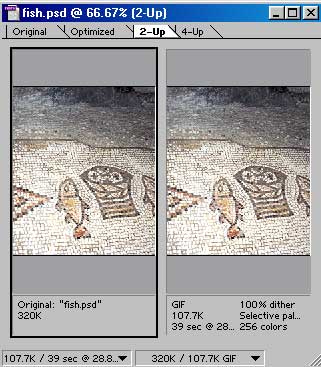
- Improved Optimization--ImageReady
allows two-up and four-up viewing of images, and
 automatically
generates smaller optimized versions of the current image. You can
also save and apply named optimization settings. The graphic on the
right shows an image in ImageReady using a 2-up view. automatically
generates smaller optimized versions of the current image. You can
also save and apply named optimization settings. The graphic on the
right shows an image in ImageReady using a 2-up view.
- Slicing--Sophisticated slicing
capabilities enable you to divide a document into sections, making
it easier to arrange multiple elements (such as buttons, banners,
and graphics) and selectively optimize selections of a document.
- Rollovers--You can create rollover
effects in which different states of an image are activated when a
user rolls over or clicks a slice, for example. You can display images
or animations as rollover states.
- Improved Animation--It is easier
to select frames (including multiple contiguous or discontiguous frames),
to specify delay or duration, and to optimize animation files. You
can also import QuickTime-compatible movie formats, including MOV,
AVI, and Flic to view and edit.
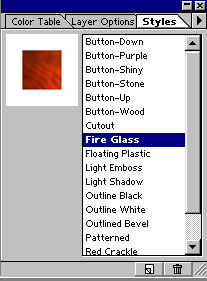
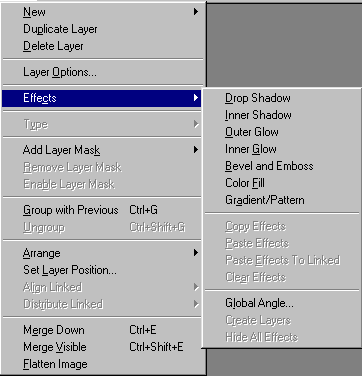
- Layer Effects and Styles--ImageReady
includes layer effects--automated effects that you
 can apply to layers. ImageReady includes pattern and gradient fill
effects, as well
can apply to layers. ImageReady includes pattern and gradient fill
effects, as well  as
all the layer effects available in Photoshop. You now have drop shadows,
glows, beveling, embossing, and solid color fill. ImageReady also
includes Styles--sets of layer effects that you can save and reapply.
The image to the left shows various layer effects you can choose from
in ImageReady, and the image on the right shows the styles that you
can choose. as
all the layer effects available in Photoshop. You now have drop shadows,
glows, beveling, embossing, and solid color fill. ImageReady also
includes Styles--sets of layer effects that you can save and reapply.
The image to the left shows various layer effects you can choose from
in ImageReady, and the image on the right shows the styles that you
can choose.
- Shape Tools--New shape tools,
including the rectangle, rounded rectangle, and ellipse tools, let
you draw basic shapes on an image. Like the line tool, the shape tools
create bitmap shapes (not vector objects).
- Type Enhancements--ImageReady
editable type is now fully compatible with Photoshop type. New options
in the Type tool dialog box let you apply simulated type styles, choose
from various anti-aliasing methods, and better control the placement
of low-resolution type. You can also add type directly on the type
layer in an image (rather than in the Type tool dialog box).
|
|
Tight Integration of Photoshop and ImageReady:
The link on the Tool Box in each program makes it easy to jump from
one program to the other. Once you click the Jump To button in Photoshop,
the file is automatically imported into ImageReady with the layers and
paths intact, basically preserving all aspects of a standard .psd file.
Once both programs are open, you can go back and forth between them,
keeping the same file open, thus no closing and saving the file, no
reopening in the other program, no dragging between windows. You can
even use the History palette to erase steps performed in the other program.
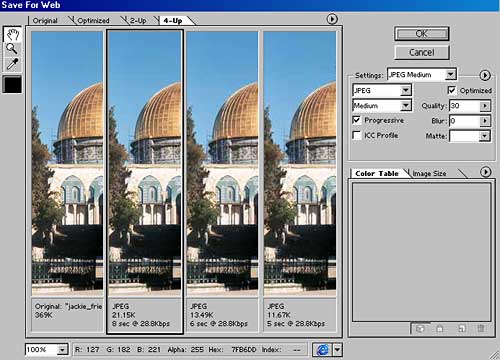
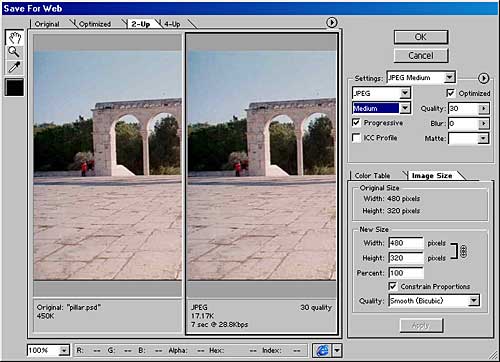
Save for Web Dialog Box and Web Features:
The new Web features make this upgrade a must for anyone creating Web
pages. The Save for Web option offers a choice of 2-up or 4-up views
for comparing the original image with optimized versions. The image
quality can be compared across 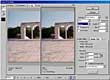 windows
while scrolled or zoomed to any point in the image, since all four side-by-side
windows scroll and zoom together. Also, the image can be viewed as it
would appear with Netscape or Internet Explorer, using standard Macintosh
or Windows color settings. For JPEG images compression settings (see
image to the left), you can select among low, medium, or maximum image
quality or specify a number between 1 and 100 for more subtle control;
a blur can be specified to reduce artifacts; a matte background windows
while scrolled or zoomed to any point in the image, since all four side-by-side
windows scroll and zoom together. Also, the image can be viewed as it
would appear with Netscape or Internet Explorer, using standard Macintosh
or Windows color settings. For JPEG images compression settings (see
image to the left), you can select among low, medium, or maximum image
quality or specify a number between 1 and 100 for more subtle control;
a blur can be specified to reduce artifacts; a matte background  color
can be selected for semi-transparent pixels progressive display can
be enabled or disabled; and optimization can be applied. You can also
specify a target file size, and Photoshop will try different quality
JPEG settings and match the desired file size while optimizing image
quality. For GIF images (see image to the right), you can control the
color table size and makeup; method of dither used; degree of loss;
use of interface; and can specify a matte color for semitransparent
Photoshop source image pixels. color
can be selected for semi-transparent pixels progressive display can
be enabled or disabled; and optimization can be applied. You can also
specify a target file size, and Photoshop will try different quality
JPEG settings and match the desired file size while optimizing image
quality. For GIF images (see image to the right), you can control the
color table size and makeup; method of dither used; degree of loss;
use of interface; and can specify a matte color for semitransparent
Photoshop source image pixels.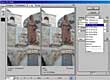 This color table can be the standard Web table, an adaptive table of
specified size, selective, perceptual, or custom. Each view displays
details about that view such as format, file size, download time, number
of colors, compression, and more. There are preset GIF and JPG combinations
that offer quick optimization in both Photoshop and ImageReady (see
image to the right). You can also add custom combinations to the Optimization
Named settings.
This color table can be the standard Web table, an adaptive table of
specified size, selective, perceptual, or custom. Each view displays
details about that view such as format, file size, download time, number
of colors, compression, and more. There are preset GIF and JPG combinations
that offer quick optimization in both Photoshop and ImageReady (see
image to the right). You can also add custom combinations to the Optimization
Named settings.
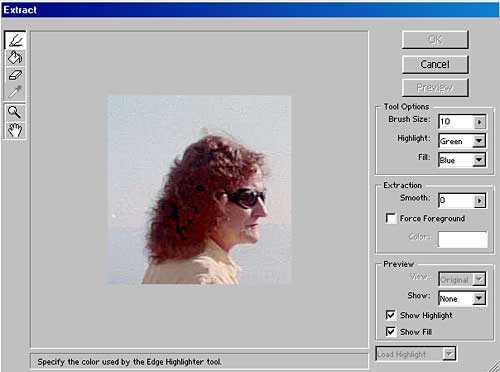
Extract Command: This tool is great
for isolating a foreground object from its background. It works well
with objects with wispy, intricate, or undefinable edges. The 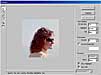 feature
is easy to use, with a variety of options in the dialog box to give
you control over what you are doing. And you can preview and refine
your results of extraction as many times as necessary before performing
the final action. I think the feature streamlines the process of making
a transparency, and does a good job of "decontaminating" the
edge pixels which effectively removes the tint of background color or
halo feature
is easy to use, with a variety of options in the dialog box to give
you control over what you are doing. And you can preview and refine
your results of extraction as many times as necessary before performing
the final action. I think the feature streamlines the process of making
a transparency, and does a good job of "decontaminating" the
edge pixels which effectively removes the tint of background color or
halo 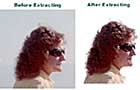 effect.
Inexperienced users of Photoshop or transparency techniques should find
the Extract command a useful feature. Experienced users could use it
and then refine their work further using Photoshop's Background Eraser,
Cloning tool, or History brush. On the left is the Extract command dialog
box, and on the right is a graphic showing a photo with a background
and then the same photo after extracting the background. I really liked
the Extract feature, and was surprised at the excellent job it did on
wispy hair. effect.
Inexperienced users of Photoshop or transparency techniques should find
the Extract command a useful feature. Experienced users could use it
and then refine their work further using Photoshop's Background Eraser,
Cloning tool, or History brush. On the left is the Extract command dialog
box, and on the right is a graphic showing a photo with a background
and then the same photo after extracting the background. I really liked
the Extract feature, and was surprised at the excellent job it did on
wispy hair.
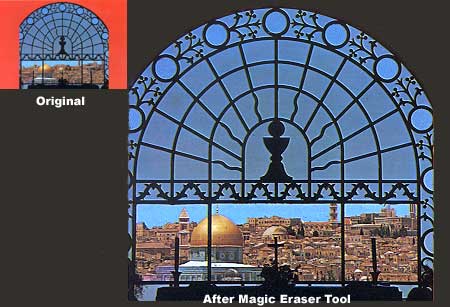
Magic Eraser Tool: The Magic Eraser
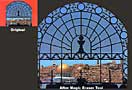 erases sections of a layer--creating transparency--with a simple click
of your mouse. You can control whether it erases all pixels on a layer
that are similar in value to the one you first clicked or only similar
pixels that are contiguous to the one you first clicked. You can also
set tolerance levels that define how close in value other pixels must
be for the magic eraser to make them transparent. The graphic on the
left shows an original photo and then the photo after using the Magic
Eraser tool. This tool is perfect for removing a color from a hard-edged
object.
erases sections of a layer--creating transparency--with a simple click
of your mouse. You can control whether it erases all pixels on a layer
that are similar in value to the one you first clicked or only similar
pixels that are contiguous to the one you first clicked. You can also
set tolerance levels that define how close in value other pixels must
be for the magic eraser to make them transparent. The graphic on the
left shows an original photo and then the photo after using the Magic
Eraser tool. This tool is perfect for removing a color from a hard-edged
object.
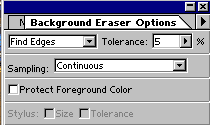
Background Eraser Tool: The tool
works similarly to the Magic Eraser tool, except you make pixels transparent
by dragging rather than clicking. As you drag the mouse across an image,
the 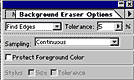 background
eraser dynamically erases pixels. In addition, you control background
eraser dynamically erases pixels. In addition, you control  whether
dragging with this tool erases all the pixels you drag over, only those
that match the first pixel sampled, or only pixels that match the current
background color. You also determine whether dragging erases contiguous
or noncontiguous pixels that match your masking criteria. Other options
let you control the tool's brush size (or the size of the swathe you
create as you drag), as well as set the tolerance and the relative softness
or hardness of the remaining object edges. Like the Extract command,
this tool "decontaminates" the edge pixels, thus removing
the tint of background color. The image to the left shows the dialog
box for the Background Eraser tool, and the image on the right shows
a before and after image. Sometimes you might want to use a combination
of eraser tools, and you can switch between the Eraser, Magic Eraser,
and Background Eraser tools by pressing Shift+E. The Magic Eraser, Background
Eraser, and Extract command work well with backgrounds of relatively
homogeneous colors. whether
dragging with this tool erases all the pixels you drag over, only those
that match the first pixel sampled, or only pixels that match the current
background color. You also determine whether dragging erases contiguous
or noncontiguous pixels that match your masking criteria. Other options
let you control the tool's brush size (or the size of the swathe you
create as you drag), as well as set the tolerance and the relative softness
or hardness of the remaining object edges. Like the Extract command,
this tool "decontaminates" the edge pixels, thus removing
the tint of background color. The image to the left shows the dialog
box for the Background Eraser tool, and the image on the right shows
a before and after image. Sometimes you might want to use a combination
of eraser tools, and you can switch between the Eraser, Magic Eraser,
and Background Eraser tools by pressing Shift+E. The Magic Eraser, Background
Eraser, and Extract command work well with backgrounds of relatively
homogeneous colors.
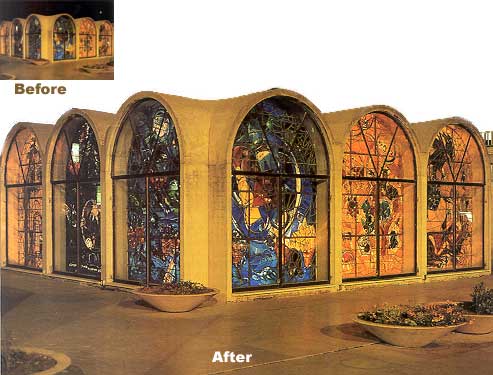
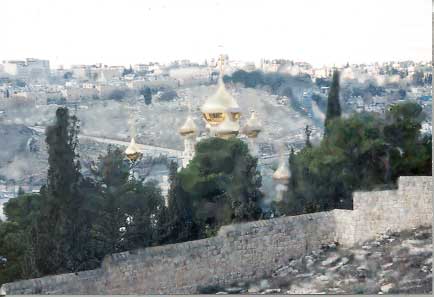
Art History Brush: This brush lets
you paint stylized strokes on an image, using the source data 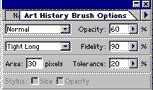 from
a specified history state or snapshot. You can control size, fidelity,
tolerance, and stroke style options for the brush, which all affect
the from
a specified history state or snapshot. You can control size, fidelity,
tolerance, and stroke style options for the brush, which all affect
the 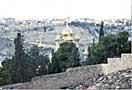 results
of the paint simulation. You then simply move the Art History brush
around on your image, interactively creating realistic paint strokes,
and you don't have to specify colors or apply careful strokes. Once
you learn the basics of the Art History brush, you can combine it with
other Photoshop tools with artful results. The image to the right shows
how the Art History brush can bring life to a rather ordinary photo.
It is a fun tool and easy to use. results
of the paint simulation. You then simply move the Art History brush
around on your image, interactively creating realistic paint strokes,
and you don't have to specify colors or apply careful strokes. Once
you learn the basics of the Art History brush, you can combine it with
other Photoshop tools with artful results. The image to the right shows
how the Art History brush can bring life to a rather ordinary photo.
It is a fun tool and easy to use.
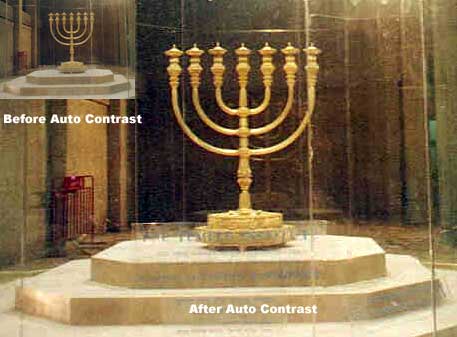
Auto Contrast Command: This is
a great command for a quick contrast adjustment. It lets you adjust
the highlights and shadows of an image automatically. The command maps
the darkest and 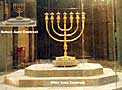 lightest
pixels in the image to black and white, causing highlights to appear
lighter and shadows darker. When adjusting the contrast, Photoshop ignores
the first 0.5% range of both the white and black pixels in the image.
This clipping of color values ensures that white and black values are
representative areas of the image's content, rather than extreme pixel
values. The graphic on the right shows a an image before auto contrast
and the same image after the Auto Contrast command has been applied.
I used the Auto Contrast command for a quick enhancement on all the
photos in this review. lightest
pixels in the image to black and white, causing highlights to appear
lighter and shadows darker. When adjusting the contrast, Photoshop ignores
the first 0.5% range of both the white and black pixels in the image.
This clipping of color values ensures that white and black values are
representative areas of the image's content, rather than extreme pixel
values. The graphic on the right shows a an image before auto contrast
and the same image after the Auto Contrast command has been applied.
I used the Auto Contrast command for a quick enhancement on all the
photos in this review.
Creating Multiple Image Layouts:
Photoshop 5.5 automates the creation of contact sheets, picture packages,
and navigable HTML pages, saving you the time of creating them by hand.
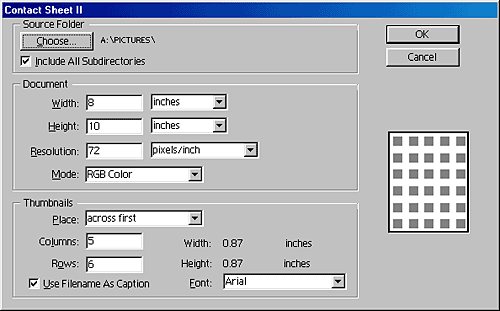
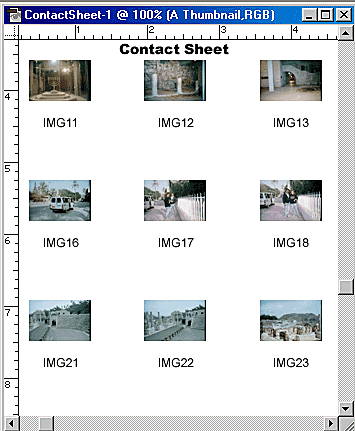
Contact Sheets--Using the Contact Sheet II command, you can
display a series of 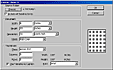 thumbnail
previews on a single page. You can choose whether to thumbnail
previews on a single page. You can choose whether to  arrange
thumbnails horizontally (front left to right, then top to bottom)
or vertically (from top to bottom, then left to right); enter the
number of columns and rows that you want per contact sheet; label
the thumbnails using their source image filenames; and specify a caption
font. The image to the left shows the Contact Sheet II dialog box,
and the image to the right shows a contact sheet. arrange
thumbnails horizontally (front left to right, then top to bottom)
or vertically (from top to bottom, then left to right); enter the
number of columns and rows that you want per contact sheet; label
the thumbnails using their source image filenames; and specify a caption
font. The image to the left shows the Contact Sheet II dialog box,
and the image to the right shows a contact sheet.
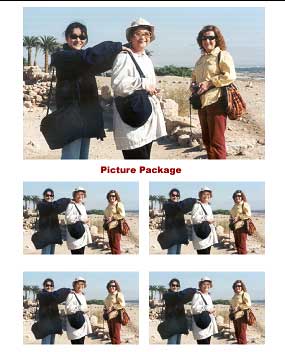
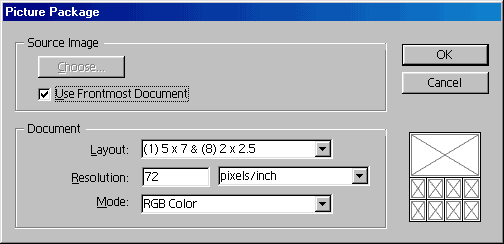
Picture Packages--With the Picture Package command, you can
place multiple copies  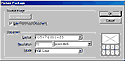 of
a source image on a single page, similar to the photo packages traditionally
sold by portrait studios. You can choose from a variety of size and
placement options to customize your package layout. The image to the
left shows the Picture Package dialog box, and the image to the right
shows an example of a Picture Package. of
a source image on a single page, similar to the photo packages traditionally
sold by portrait studios. You can choose from a variety of size and
placement options to customize your package layout. The image to the
left shows the Picture Package dialog box, and the image to the right
shows an example of a Picture Package.
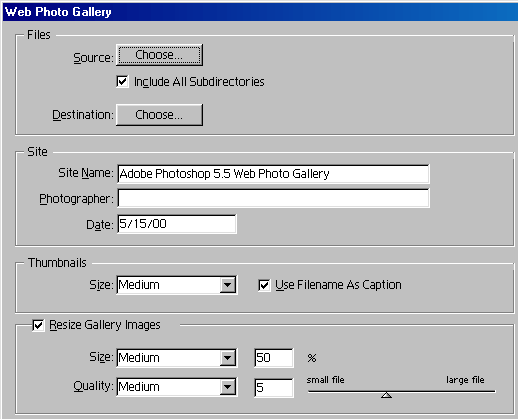
Web Photo Galleries--The Web Photo Gallery command lets you
export your images  as
a gallery Web site, complete with a thumbnails index page, individual
JPEG image pages, and navigable links. Photoshop automatically as
a gallery Web site, complete with a thumbnails index page, individual
JPEG image pages, and navigable links. Photoshop automatically 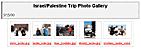 processes
the images and HTML code to simplify the task of publishing your images
online. The image to the left shows the Web Photo Gallery dialog box.
If you click on the image to the right, you can view a Web Gallery
that I created from some of the photos used in this review. This feature
is really easy to use and fun! processes
the images and HTML code to simplify the task of publishing your images
online. The image to the left shows the Web Photo Gallery dialog box.
If you click on the image to the right, you can view a Web Gallery
that I created from some of the photos used in this review. This feature
is really easy to use and fun!
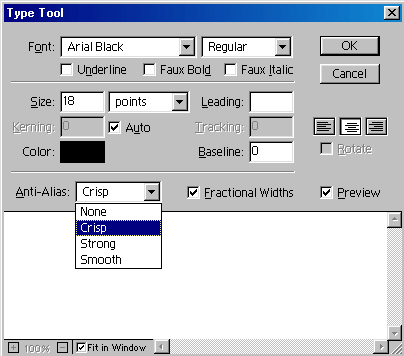
Type Options: Several new options
in Photoshop and ImageReady, in the Type tool dialog box let you apply
simulated type styles, choose from various anti-aliasing methods, and
better control the placement of low-resolution type. Anti-aliasing lets
you produce smooth-edged type by partially filling the edge pixels,
and can make  small
type sizes appear more readable when viewed online. The new anti-aliasing
options now enable you to select from three levels of anti-aliasing
to modify the appearance of type online: crisp, strong, and smooth.
You can also choose none to apply no anti-aliasing. Photoshop now includes
simulated type styles for bold, italic, and underline type, allowing
you to apply these styles to any type, even type created with font families
that do not include these styles. Photoshop and ImageReady display type
using fractional character widths. This means that the spacing between
characters varies, with fractions of whole pixels between some characters.
For type in small sizes that are displayed online, fractional character
widths can cause type to run together, making it difficult to read.
You can now turn off fractional character widths. The image to the right
shows the three levels of anti-aliasing, type styles, and fractional
widths check box. small
type sizes appear more readable when viewed online. The new anti-aliasing
options now enable you to select from three levels of anti-aliasing
to modify the appearance of type online: crisp, strong, and smooth.
You can also choose none to apply no anti-aliasing. Photoshop now includes
simulated type styles for bold, italic, and underline type, allowing
you to apply these styles to any type, even type created with font families
that do not include these styles. Photoshop and ImageReady display type
using fractional character widths. This means that the spacing between
characters varies, with fractions of whole pixels between some characters.
For type in small sizes that are displayed online, fractional character
widths can cause type to run together, making it difficult to read.
You can now turn off fractional character widths. The image to the right
shows the three levels of anti-aliasing, type styles, and fractional
widths check box.
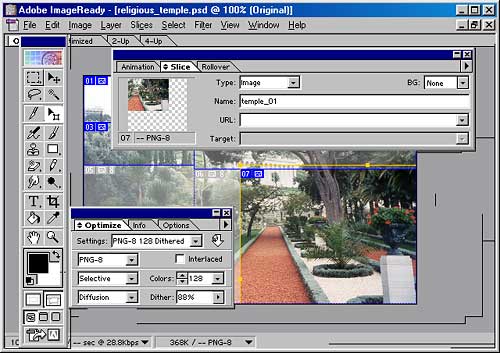
ImageReady: The program offers
a variety of advanced controls for creating Web graphics. You can perform
such tasks as JavaScript rollovers, animations, sliced images and image
maps and 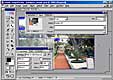 ImageReady
will write the JavaScript and HTML to make your task easy. One of the
best features is the ability to optimize slices individually. This feature
is especially helpful if your image includes both text and photos, since
you can save the text as a GIF, and save the photos as JPEGs. The graphic
to the left shows an image that was sliced and then different formats
and compression settings were used on each area. You can drag and drop
to apply the different settings. For anyone wanting to create sophisticated
graphics for the Web, without knowing any HTML, this is the perfect
program. ImageReady
will write the JavaScript and HTML to make your task easy. One of the
best features is the ability to optimize slices individually. This feature
is especially helpful if your image includes both text and photos, since
you can save the text as a GIF, and save the photos as JPEGs. The graphic
to the left shows an image that was sliced and then different formats
and compression settings were used on each area. You can drag and drop
to apply the different settings. For anyone wanting to create sophisticated
graphics for the Web, without knowing any HTML, this is the perfect
program.
Wish List: Here is the list for
the next version.
- Putting some of ImageReady's features right in Photoshop;
- Ability to use Actions macros between ImageReady and Photoshop instead
of creating them in each program;
- More tools for generating masks;
- Ability to type in the name or partial name of a font, as in Illustrator,
rather than use a font selection "pull down" menu;
- Similar handling of text editing in both programs;
- More types of strokes for the Art History brush;
- Ability to have custom titles for captions in Web photo gallery;
- Frame options for Web photo gallery.
|